Aug 05 2013
Dim Sum for Dinner
Last May, while my father was visiting from France, we went to Red Farm, a tiny but lovely Chinese restaurant in Manhattan’s West Village. The restaurant has a reputation for serving some of the best dim sum in the city, and it truly did not disappoint us. Everything we ate there was really fresh and delicious, and the presentation lovely.
I have been meaning to make some dim sum at home for a while, but somehow one of two things kept happening: either I did not have enough time, or, when I did have the time, I simply forgot and did something else. Just recently, however, while surfing a few sites for inspiration, I was reminded that I really wanted to do this; baozi has all the trappings of comfort food (yeasty and savory), yet it’s different enough from the every day ho-hum that it can give the Western home cook a bit of a reprieve from boredom. Since I’m on a teaching break, I really had no excuse for procrastinating, and thus I jumped right in.
On a day when you feel you have a little bit of time ahead of you, and you feel like making a really good meal, one that will likely give you a break from your daily routine, this is just the thing. It requires a little bit of planning ahead, and I suggest you read through the recipe a couple of times before starting, but there is nothing there that is so complex a home cook can’t handle it. Give it a try – it’s good to experiment from time to time!
Vegetable Baozi
For the dough:
2 cups all-purpose flour
1.5 tsp yeast (instant or active dry*)
1 tsp baking powder
2 Tbsp sugar
pinch of salt
1 Tbsp neutral oil (peanut or grapeseed)
a few drops of sesame oil
1/2 cup + 2 Tbsp lukewarm water
*If using active dry yeast, proof first in the water with a pinch of sugar. Add this to the dry ingredients.
In a standing mixer or food processor, blend together all dry ingredients. Add water and oils, and blend until a smooth ball of dough forms. (Note: you can do this by hand, but a mixer or processor makes this part much less of a chore.) When the dough is smooth, form into a ball. Drizzle 1 tsp of oil at the bottom of a large bowl, place the ball of dough in the bowl and turn over to coat with oil. Cover with a cloth or plastic wrap, and let the dough rise in a warm place until doubled in size (this could take anywhere from 30 to 60 min.). I do this in my oven, which has a ‘proofing’ setting that provides just enough heat to let the dough rise nicely. While this is going on, make the filling.
For the filling:
1/2 head of Savoy or Napa cabbage, finely shedded
1 medium carrot, shredded
4 oz fresh shitake mushrooms
1/3 oz dried shitake or porcini mushrooms, reconstituted in 1 cup boiling water
3/4 cup filtered liquid from reconstituted mushrooms*
2 scallions, sliced
2 Tbsp grated ginger
2 cloves garlic, chopped
4 Tbsp peanut or grapeseed oil
2 Tbsp soy sauce
1 tsp agave syrup
1.5 tsp corn starch, diluted in 1 tsp water
1/2 tsp hot sesame oil
1 tsp sesame oil
black pepper
dash sea salt if needed
* To reconstitute dried mushrooms, place in one cup boiling water and cover. Let stand for about 15 minutes. Strain the mushrooms (save that liquid!) and rinse them well before chopping them. Filter the reserved liquid through a coffee filter and set aside.
Note: it pays to prep the vegetables ahead of time, say the day before you know you will make this.
Braise the cabbage: in a large saute pan, put 1/2 cup water + 2 Tbsp oil. Add cabbage, cover, bring to a boil and cook until most of the water has evaporated and the cabbage is wilted. Uncover and saute the cabbage for a few more minutes, until it begins to color. Add 1 Tbsp soy sauce, cook 2 more minutes, and remove from pan.
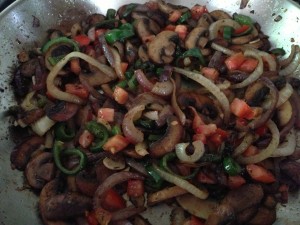
In the same pan, sauté mushrooms, carrot, and ginger in 2 Tbsp oil with a few grinds of black pepper until mushrooms begin to color. Add garlic and scallions. After one minute, deglaze the pan with reserved liquid from mushrooms and 1 Tbsp soy sauce. Bring to a boil and add cornstarch. When the mixture has thickened, remove from flame. Add sesame oils and agave syrup, mixing well. Blend with cabbage. Taste and adjust seasoning as necessary. Let cool before using as filling. This can be made up to a day ahead of time.
Assembling the baozi:
When the dough is ready, punch it down and turn it over onto a lightly floured surface. Knead it briefly to remove all air bubbles, then roll the dough into a thick rope. At this point, you have to decide how many baozi you want to make. You could make (what I did) 12 medium-large dumplings, or 16 smaller ones. Cut the dough into evenly-sized pieces, and place them aside, cut side down and covered with a wet paper towel to prevent drying out, until ready to use them.
![IMG_0862[1]](http://flexitarian.christinesusskind.com/wp-content/uploads/2013/07/IMG_08621-300x225.jpg)
This is about half of the dough. Notice the end piece is a bit wider, since the dough rope tapers at the end.
Make sure your work surface is lightly floured. One piece at a time, using a taco press (or just the bottom of a large glass measuring cup, as I did), flatten each piece of dough into a small disk shape.
With a rolling pin, roll out this disk into a larger one, trying to leave the center of the disk a bit thicker than the edges – in this manner, when you gather the edges to form the baozi, the whole dumpling will have more or less the same thickness of dough all around.
Put 1 to 2 Tbsp of filling in the center of the dough circle, and close the baozi by making accordion pleats all around, like this:
Place face up (if they’re really pretty) or down (like I did, since my wrapping technique isn’t all that yet) on your work surface, and cover with a wet paper towel while you finish assembling the others.
Cooking the baozi:
Line the basket of a steamer (bamboo or otherwise) with parchment paper, to prevent sticking. Place a few baozi at a time in the basket (beware, they will puff up quite a bit, so you need to give them room), and steam until puffy and done: 15 min. or so for the medium-large size, or 12 min. for smaller ones. Keep baozi warm in a very low oven (about F150) while you cook the rest.
![IMG_0873[1]](http://flexitarian.christinesusskind.com/wp-content/uploads/2013/07/IMG_08731-300x225.jpg)
See how puffy they got? At this point, they could be pan fried in a little bit of oil, but I think they're delicious as is.
Serve with a salad and a dipping sauce.
Dipping sauce:
1/3 cup rice vinegar
1/3 cup soy sauce
1 Tsbp sesame oil
1 tsp hot sesame oil or hot sauce (e.g. siracha)
1 tsp grated ginger
1 clove crushed garlic
Optional: sliced scallions and/or sesame seeds
Salad:
1 cucumber, seeded and thinly sliced
2 carrots, shredded
3 scallions, sliced
1 handful cilantro, chopped
1 cup red leaf lettuce, sliced
Dressing for salad:
1 tsp grated ginger
1 clove crushed garlic
1 tsp peanut butter
1 tsp sesame oil
1 tsp lime juice
1 tsp soy sauce
2 tsp rice vinegar
1 Tbsp peanut oil
Blend peanut butter with sesame oil. Add all other ingredients except oil and whisk together till smooth. Slowly add peanut oil and whisk until emulsified.

![IMG_0575[1]](http://flexitarian.christinesusskind.com/wp-content/uploads/2013/07/IMG_05751-300x225.jpg)
![IMG_0860[1]](http://flexitarian.christinesusskind.com/wp-content/uploads/2013/07/IMG_08601-300x225.jpg)
![IMG_0861[1]](http://flexitarian.christinesusskind.com/wp-content/uploads/2013/07/IMG_08611-300x225.jpg)
![IMG_0859[1]](http://flexitarian.christinesusskind.com/wp-content/uploads/2013/07/IMG_08591-300x225.jpg)
![IMG_0864[1]](http://flexitarian.christinesusskind.com/wp-content/uploads/2013/07/IMG_08641-300x225.jpg)
![IMG_0863[1]](http://flexitarian.christinesusskind.com/wp-content/uploads/2013/07/IMG_08631-300x225.jpg)
![IMG_0868[1]](http://flexitarian.christinesusskind.com/wp-content/uploads/2013/07/IMG_08681-300x225.jpg)
![IMG_0869[1]](http://flexitarian.christinesusskind.com/wp-content/uploads/2013/07/IMG_08691-300x225.jpg)
![IMG_0865[1]](http://flexitarian.christinesusskind.com/wp-content/uploads/2013/07/IMG_08651-300x225.jpg)
![IMG_0866[1]](http://flexitarian.christinesusskind.com/wp-content/uploads/2013/07/IMG_08661-300x225.jpg)
![IMG_0867[1]](http://flexitarian.christinesusskind.com/wp-content/uploads/2013/07/IMG_08671-300x225.jpg)
![IMG_0870[1]](http://flexitarian.christinesusskind.com/wp-content/uploads/2013/07/IMG_08701-300x225.jpg)
